Showing posts with label Dotty For You. Show all posts

Sunday, December 23, 2012

Live Love Laugh NEW coasters!

Hello there fellow Crafters!!!


I wanted to post this up REAL quick... since I have been such a bad girl about posting. So I figured a quick post is better than NONE at all!

I had an order for coasters for Christmas gifts and I was VERY pleased with our NEW alcohol based markers. I used them to color in the flower and they DID NOT bleed when I put the mod podge over it!!! TRIPLE SCORE!!!! :) yes that is very important!! Last thing you want is to color in something so beautiful and have it bleed when your sealing it! ;)

Here is the final product! I have to admit... I am keeping these for me, as I made extra! Shhhhhh dont tell.


Hope you enjoyed my quick post!

Here is a Video Tutorial I created a while back on how to make these SUPER easy Coasters. :) 


Friday, July 13, 2012

Mini Scrapbook Album


TADA! here is the latest Item I created....

I put this together in just one day... took me longer to get the photos done for this blog post ;)

The pages are 5x7 and fit up to 4x6, Sure you can fit a 5x7 but then you wouldn't  see the nice paper.


Here is the Cover you can insert a picture into it, and it has a 2x2 opening.


This is the first page on the inside. The picture will slide right in, the "title" is not stuck on the page all the way so the picture will sit right behind it on the yellow "mat"


 This is pg 2-3


Here is pg 4-5


 Close up of pg 5


pages 6-7 with tag closed
 

Close up of pg7 TAG
 Pgs 8-9


Tag pulled out on pg 8


Pg 10-11
 My favorite set of pages


pgs 12-13


 Pg 14 and end cover


Pg 14 Close up


Hope you enjoyed this mini scrapbook. It will be up for sale on my Etsy shop Check it out!

There are a few other items listed on  Etsy :)
   

Friday, June 22, 2012

8 mini cards from 1 12x12 sheet.

So I created 8 mini cards (3"x3") out of ONE 12"x12" Card Stock! Awesome right?

I used Close to My Heart's Colonial white 12x12 CS to make these cute "mini" cards. So much potential in this!

You will Need:

 Step 1: cut in half

Step 2:  cut into 3" strips

You will get 8 3"x6" strips

Step 3:  Score in the middle

Step 4:  Fold at the score
I made some of these mini cards into "Top" fold cards (Bottom row) and some into "Side" fold cards (Top Row).

 Here is the Final Product!!!  I only took pictures of 3 ;)
 I used Life is tweet stamp set. Available as the SOTM for June!!

Here is the inside of each individual card... 
For the inside of the 1st card I used Nursery bash D1236 (retired stamp set), for the rest Life is tweet S1206
Hope you enjoyed this quick and easy way to create mini cards out of one 12x12 CS!

I made several Happy birthday ones, and several "Thank you" cards!

Wednesday, June 20, 2012

Flip Flaps!

I apologize for the delay with this post.... but I am FINALLY DONE! wooo hooo! (lol)

So when I came to these set of photos in the album as the "next" to be scrapbooked I knew I did not want to just settle on a few... So I figured I had to use Flip Flaps, I have never used them before. First time for everything. What are Flip Flaps you may ask? well they are like small page protectors for individual pictures. In this LO I used the 4x6 size, but there are many different sizes so you can created even smaller LO "flaps" to go over your bigger 12x12 LO.

The waiting was having to order them, and then wait for my fedex man to arrive.... By then it was time for me to get ready to go on vacation (Darn) lol! ok enough rambling so here's the LO.

I used one of my favorite paper packs "Dotty for you" and I used the "life is Tweet" stamp set (this is the stamp of the month [SOTM] for June 2012). I used Lagoon ink and color pencils to color in the stamp.

click to view Larger
I Just Love these Colors!!!! they are so Spring like. I didn't know what I was going to use for "Title" purposes except for "Sunbathing" (Which I used the "Urban Alphabet" stamp set). Towards the end of piecing things together I realized I had just gotten my shipment and had the SOTM on hand! I felt it went with the theme... Plus I just wanted to use the darn Bird! (Isn't he cute!!) So many possibilities.

Click to View Larger
 For the Right side LO I used the cloud and cut out an extra from a scratch piece of paper and just used adhesive to one end (the far left side of the cloud) and attached it to the LO strategically so it would cover up his XXX rated photo... LOL! I know, I know too much.  But thought it was a cute addition, plus the cloud is glued on so its more of a "Flap" so if you really wanted to see his cute little bum entirely just lift... ;)

Here is a close up of the cloud "flap"
Click to view Larger
See its just another "Flap" made from the cloud cut out.

Ok on to the Left side of the LO. Isn't my Little man adorable! this was 6 years ago... how I miss those days! So on this side is where I used the "Flip Flaps".  Both of these 4x6 Pictures have 2-3 more pictures underneath them. I thought that they might be tricky to use but not at all. Once I figured out how I wanted to place my pictures I just put them inside each of the "Flip flaps" and then peel off the paper to reveal the sticky side and stick them onto the LO.
  
Click to view Larger          


Here is the same page only with the "Flaps" open. There are a few more flaps under the pictures on the left side, just didn't take a picture.
 
click to view larger

I am super excited to be using flip flaps now, this way I will not have to pick and choose several pictures. If I wanted to I can have 20+ pictures all in one LO!! 
Here is one last close up of my baby and the birdie....

Stay tuned for more LO featuring "Flip Flaps" I am Pretty sure I will be using more of these... as you can see I cant just take 1-2 photos of a single moment! :)


Saturday, May 26, 2012

CTMH contest!

Hey everyone! I have entered a contest on the CTMH FB page... and would love if you helped me out by voting. Just click on the link: Vote for me :) and that's it!

Thanks so much! This is the art work I submitted it had to be using the dotty paper pack:

Thanks Again!!

Tuesday, May 15, 2012

my Mom's Day cards

Quick post Here are the cards  I gave on mothers day. Hope everyone had a wonderful Mother's Day!


The "Inside"

Saturday, May 12, 2012

Mother's Day


Just wanted to send a Wonderful Mother's Day Wish to all the mothers out there. 
Hope you all have a Fabulous day tomorrow!


Don't forget you have until May 31st to get in the Dotty FUN! place a $35 order and get the Dotty paper pack for $5! that's a value of $19.99!


Friday, April 27, 2012

Mini booklet Revamp

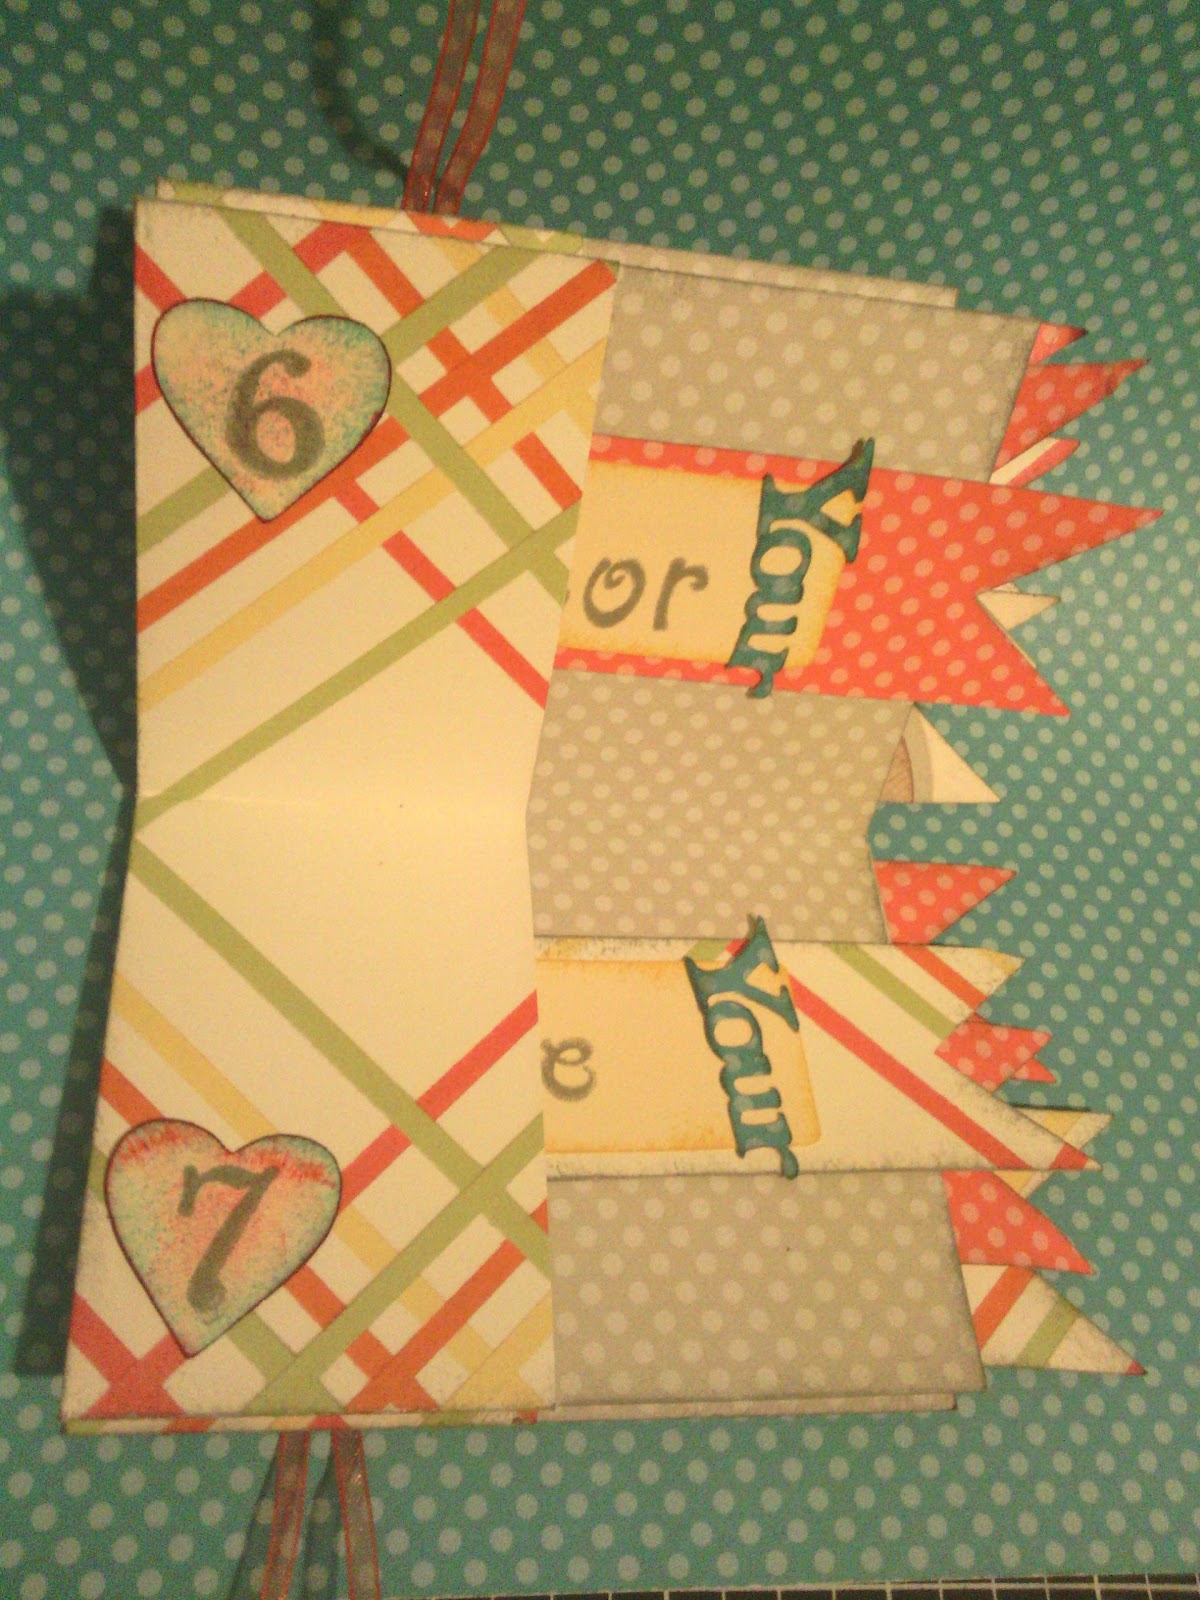
This is a Mini- Booklet I made same with using the one sheet of paper. I turned it on its side so that it "flipped up" to open. This way the pockets were on the side and I could slip in some tags. I was trying out new ideas, and I was itching to use the stamp "10 things" and this is how I put it to work. 


I LOVE how it turned out!!

For the inside I used my AP cartridge to cut out the "tags" and the hearts for the numbers.
 Since the stamp is "10" things... and the booklet only has 8 pockets I had to double up on 2 pockets, but it worked out GREAT!
Here is a close up of a few of the tags I made. the word "your" was also cut out with the AP cartridge. I used the Cricut Craft Room (CCR) to weld the letters together. This way I only had to peel off individual words, rather than each individual letter...can you imagine!!

Finally I used a ribbon to hold it together, I glued it to the back and front covers and tied a bow. 
 Check out the video tutorial on how to create your own mini-booklet. It's posted under video tutorials OR in the previous Mini-Booklet post.

ENJOY!


Friday, April 20, 2012

Dotty For You

I got my shipment today and inside was the FABULOUS Dotty For You paper pack!! and **Drum Roll** Please...... I LOVE IT! (I mean Really are you surprised?) ;) Here's a picture of what you get. 
 Front Side
Back side

I was so excited when I got a look at the pack that I had to make something right away. I think it was meant to be since my mother had asked if I could put together a sweet 16 bday card for her friends daughter, she said something with butterflies. Who would have known I'd be getting Dotty paper with butterflies TODAY! :) So this is what I made:
Front

Inside

  • I used the wonderful Art Philosophy cartridge to cut out the butterflies :)
  • I used the Lay out in the Originals Card Confidence Program Book. It is called "A message secured" on Pg 77. I tweaked it a little bit to make it my own...


REMINDER:
Don't forget that you can get this VERY same paper pack from now until May 31st for $5 when you place an Order of $35 or more!! a Retail value of $19.95. Visit my store to order Click Here.